Author Archive

Rice Memories and Meanings

January 14, 2013

I grew up eating rice only occasionally, and when my mother did make it, it was simple: one cup of rice with one cup of water, with half of a jalapeno thrown in. It was so unmemorable that I don’t even remember what we usually ate it with. I was exposed to your standard beans and rice, the rice that comes on the side of Mexican food, but it wasn’t until I moved to Washington, D.C., that I started to discover the magic of Persian and Afghani polows, Cuban Moros y Cristianos, and the delight of Teaism’s coconut rice pudding.

In the Middle East, rice often holds near mystical rank on the dinner table, where it can come as a simple staple, mounded around a whole roasted lamb, or jeweled with nuts, dried fruit, herbs and meat. Nearly every dish has a traditional rice side it is served with. A delicious Egyptian lunch of fried fish would not be complete without a side of rice prepared with onions and tomato paste.

In Iraq, rice can be an emotional subject. When you talk to Iraqi expatriates and refugees and about their home, the topic of Iraq’s aromatic, unique and sadly disappearing rice might come up. Ethnic strife, repeated wars, water politics and environmental degradation have combined to decimate Iraq’s agricultural production, forcing Iraqis to import rice from countries such as India, China and the United States. However, Iraqis never stop longing for the aromatic allure of Amber rice, grown in small quantities in the country’s south. Those from Mosul might speak of the large, dark grains of Naggaza rice, produced in the north.

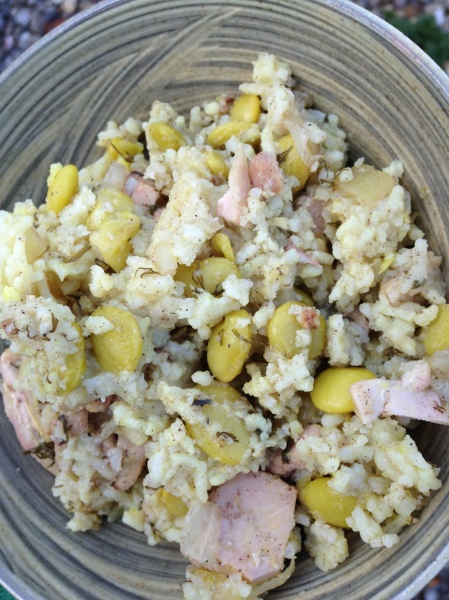
My favorite Iraqi rice dish is Timman Bagila, or fava bean rice. Whenever I see fresh fava beans and dill at the farmers market I want to make this, though I rarely see them both at the same time. While living in Lebanon, I wrote a blog post featuring my own Timman Bagila recipe using lamb shanks. This dish is a bit of a process, but none of the steps are complicated or difficult. While not as traditional, using chicken thighs produces a bit lighter but just as tasty meal!

Timman Bagila with Chicken

사진

1 12-ounce bag frozen fava beans (lima beans work too!)
pinch turmeric
2 pounds boneless chicken thighs
olive oil
salt
pepper
2 cups basmati rice, rinsed and soaked in cold water (at least an hour)
1 medium white onion, diced
2 teaspoons ground cinnamon
3 cloves garlic, minced
1 cup finely chopped fresh dill
1 lemon
2 cups hot chicken broth
toasted pine nuts or almonds (optional)

Serves 4-6.

1. Turn on your broiler, and position a rack about 8 inches below.

2. Bring a medium pot to a boil and cook fava beans with a pinch of turmeric, until the beans are soft enough to chew but not mushy. Drain the beans and set aside. Rinse out the pot — you can use it again to assemble and finish the dish.

3. Place the chicken thighs on a baking sheet and rub with olive oil and season with salt and pepper. When your broiler and oven are warm, place thighs in the oven for 12-15 minutes until cooked, turning them over about half way though. Remove from the oven and set aside.

4. While your chicken is cooking, heat a medium pot over medium heat and add drained rice, a tablespoon of salt and a pinch of turmeric. Pour in water to cover by half an inch, stir the pot, and bring to a boil. Cover the pot, and turn the heat to low. Cook for approximately 15 minutes, or until the rice has softened and most of the water is absorbed.

4. When you pull the chicken out of the oven, heat a large pan over medium heat with a tablespoon of olive oil. Add onions and a pinch of salt and sauté until translucent. Add  2 teaspoons of cinnamon and minced garlic, and stir to combine. Roughly chop the chicken, and add to the pan along with the lightly cooked fava beans and the chopped dill. Squeeze the lemon juice over the mixture, stir to combine, and cook for for 2-3 minutes, and turn off the heat. This is a good time to heat up your 2 cups of chicken broth- you can throw it in the microwave or heat it up on the stove.

5. Place the medium pot you rinsed and set aside earlier over medium-high heat, and add 2 tablespoons of olive oil. Let heat for about a minute, and evenly spread a scoop of  your parboiled rice in the pot- you want enough rice to cover the bottom. Let the rice cook for about 30 seconds- you are hoping this turns into a crust when the dish is done!

6. Add a scoop of your chicken/dill/fava bean mixture, followed by another scoop of rice, and then another scoop of your chicken mix. You want to form these layers into a bit of a pyramid- don’t smooth it out or pack the layers together. Continue this layering until you are out. With the back of your spoon make 4-5 tunnels down into the bottom of the rice layers, and pour in your hot chicken broth. When the liquid starts to bubble, cover the pot and turn the heat to low. After 20 minutes, check to see that the rice has absorbed the liquid and is cooked- if not, put the lid back on for 5 minutes and check again.

7. When you are ready to serve the dish, scoop it out onto a platter. Scrape out the pieces of crust on bottom and arrange on top of the rice. If you can’t get the crust out, fill your sink with a bit of cold water and hold the bottom of the pot in the water to help loosen the crust. I like to garnish the dish with some toasted pine nuts or almond slivers.
How to Buy a Japanese Chef’s Knife

December 21, 2012

After learning so much about how to pick a cutting board at Bernal Cutlery, I decided to ask Josh about the basics of choosing a chef’s knife. Bernal Cutlery primarily focuses on Japanese-style knives, but also carries new French knives as well as a selection of refurbished recent, vintage and antique knives from around the world.

Bernal Cutlery doesn’t carry the seven or eleven piece knife sets that are often found in cutlery stores, simply due to the fact that most people will never use seven or eleven different kinds of knives. Instead, Josh encourages purchasing the nicest possible chef’s knife that one can afford, and then building a knife kit around that central piece. If taken care of, a good chef’s knife can last more than ten years.

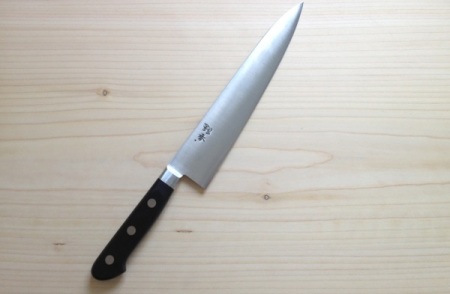
To the average home cook in search of a good chef’s knife, Josh recommends starting with a Japanese-style 210mm stainless steel blade. The alternative, carbon, requires more upkeep and care, as carbon blades are prone to rusting if left wet or with food on them (just ask Diane who almost cried when hers rusted on the drying rack because she hadn’t wiped the blade down properly). Also, if you are going to cut a lot of food that will cause the steel to react (think peaches, red onions or artichokes), wiping the blade clean during use will prevent the food from acquiring a slight metallic taste.

Many home cooks like myself enjoy the familiar weight of a heavy German knife. Japanese knives, on the other hand, tend to be thin and light, and may feel too delicate and unsteady for people used to more weight. Before testing recipes, I only used German chef’s knives. After using a Japanese-style chef’s knife during the day then returning home to a heavier German knife, I have decided to make the switch. I find that the Japanese knife moves easier, can slice thinner, and doesn’t leave my hand tired. For someone that cooks a few times a week, the difference between a heavy and a light knife may not be important, but for professionals or avid home cooks that spend hours chopping and slicing, a lightweight knife might make a big difference. Additionally, the thin, Japanese-style knives are great for fine vegetable work. The thinner blade does not wedge and crush the sides of vegetables, resulting in vegetable pieces with smoother surfaces, less oxidization and less discoloration. Josh, who encounters many fans of German knives, encourages his customers to give  Japanese knives a chance by keeping a bag of carrots in the store for them to chop to their hearts content.

I asked Josh to recommend four knives for the average home cook, and to tell me a little about each:

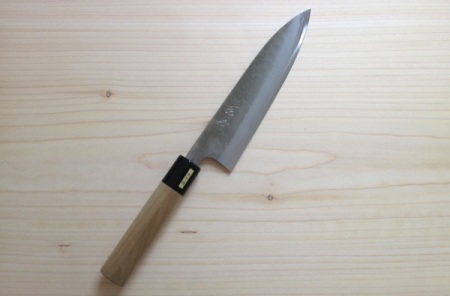
ashi

Ashi Hamono 210mm Gyuto: Swedish Stainless Steel with Western Handle

This Ashi has an excellent edge life and is very easy to sharpen. Made in small batch production and hand forged from single steel, the Ashi is light and thin, but not as delicate as many similar knives. This knife retails for $220.

yoshi

Yoshikane 180mm Gyuto: Stainless Cladding, Semi-Stainless Core and Japanese Handle

The Yoshikane above is a high quality, hand forged option that is slightly shorter than the typical chef’s knife. Constructed of three layers of steel: the outside is stainless and the core is more like carbon steel. This knife is easy to sharpen, but it also has a hard center and so it holds its edge well. The Yoshikane is thicker and a bit heavier than the Ashi. This knife retails at $180.

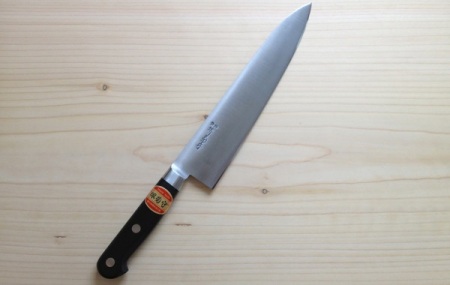
sakai

Sakai Kikumori Nihon-kou 210mm Gyuto: Carbon Steel with Western Handle

At $90 dollars less than the higher end Ashi, this Sakai has a similar outline but is a little wider and a little heavier, with a slightly shorter edge life.  This is a good entry level knife with a lot of bang for buck, especially for those planning on using a whetstone at home. They make a stainless steel version of this knife that is slightly thinner. The carbon steel version retails at $130.

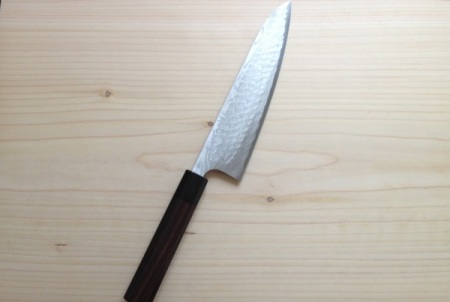
asai2

Asai Tezukuri 180mm Gyuto: Powder Metal with Japanese Handle

This gorgeous  top-shelf Japanese knife is hand forged and features a powdered steel core with an incredibly long edge life that is easy to sharpen. The beautiful acid etched Damascas cladding breaks up the surface area of the knife and makes for smooth cutting. In case you can’t tell, I’d be beyond thrilled if my boyfriend took the superfluous language in this knife’s description as an indicator of what I would love to see under the Christmas tree this year. Unfortunately for me, this knife retails for $358.

In terms of knife care, Josh says there are three main culprits that cause a large percentage of the knife damage he deals with:

  • The number one knife no-no is the dishwasher! Even though some manufactures state that their knives are dishwasher safe, don’t subject your knives to the high heat and caustic water of the dishwasher. Interestingly, stainless steel is a bit of a misnomer; this material stains less, but is not impervious to staining and rust.
  • In terms of at-home sharpening, Josh recommends learning to use a good sharpening steel or a whetstone, and cautions that using a diamond steel or a pull through sharpener (especially two carbide blades or disks that shave the metal off the knife) can be very damaging.
  • In terms of knife use, scraping on hard surfaces or wiggling and bending knives (such as cutting through a large squash) can do significant damage to both the blade and the knife’s edge. Using knives deliberately and making sure your cutting surface is soft enough to protect your knife’s edge both can go a long way to keeping your blade in good shape.

How to Choose a Cutting Board

December 18, 2012

In our search for a good knife sharpener, we stumbled across Bernal Cutlery, a charming small business in San Francisco that specializes in Japanese whetstone sharpening and carries an impressive array of knives, nearly all of which you can’t buy anywhere else in the Bay Area. After meeting Josh Donald, the owner of Bernal Cutlery, I knew that I had found my long sought-after knife-sharpening service, knife store and information resource for all things sharp.

The knife sharpener at work

The knife sharpener at work

I recently decided to replace my old plastic cutting board and thought Josh would be the perfect guy to talk to about what a home cook should look for in a food prep surface. I headed down to his cool communal space in Bernal Heights and learned about the most important things to look for in a cutting board.

331 Cortland Ave. in Bernal Heights, home to: Bernal Cutlery, Paulie's Pickling, Spice Hound, Eji's Ethiopian, Anda Piroshki, and Big Dipper Baby Food.

331 Cortland Ave. in Bernal Heights, home to: Bernal Cutlery, Paulie’s Pickling, Spice Hound, Eji’s Ethiopian, and Anda Piroshki.

Considering Josh is a knife-obsessed dealer and sharpener, it should come as no surprise that his number one priority when considering a cutting board is protecting the knives that will cut on it. If you share that priority, then a wood cutting board is the way to go. While many government and food safety organizations require the use of plastic cutting boards in commercial kitchens, significant debate exists on the topic. Ultimately, the decision to go with plastic or wood is a matter of personal preference; if you won’t be able to sleep at night without putting your cutting board through the dishwasher, then you should probably get a plastic cutting board and plan on getting your knives sharpened a little more often. Most importantly, unless you have a serious crush on your local knife sharpener, do not use your knives on serving plates or cutting boards made out of glass, marble, super hard or super soft plastics.

For those of you ready to make the switch, there are several types of wood used to make cutting boards, and each have unique advantages. Typically, wood cutting boards will be presented as hardwood or softwood, and then there is bamboo. Though bamboo is actually a grass, bamboo cutting boards share some characteristics with their wood counterparts and are popular enough to be worth addressing. Common hardwoods used for cutting boards include maple, hickory and walnut. Softwoods used for cutting boards include cedar and cypress.

Hardwood and bamboo can be used as either length grain or end grain, and softwood boards always use length grain. The hardest (too hard, by Josh’s standards) and least forgiving on knife-edges would be length grain bamboo, followed by length grain hardwoods.  Mosaicked, end grain bamboo and hardwoods create a more forgiving surface than the length grain, but still allow for the knife to slide easily. For those who prefer a little more stick to their cutting board, some of the softer length grain softwoods are a good option.

Bernal Cutlery carries two types of cutting boards. The first is a dense but soft North American cypress similar to the traditional Japanese “hinoki” wood used for cutting boards and aromatic baths. Josh sources the wood and then has pieces finished to specification by local craftsmen. The second is a smaller Umezawa–brand cutting board made out of Japanese “sawara” cypress.

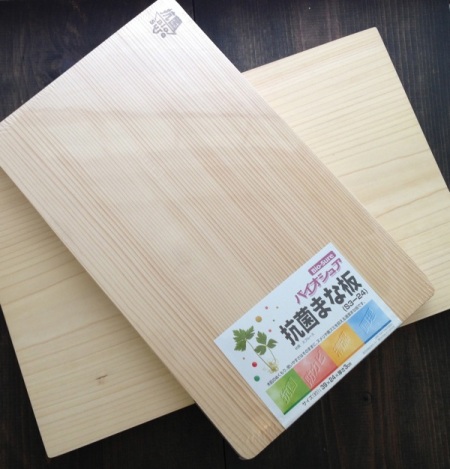
Bernal Cutlery custom Port Orford Cedar cutting board (bottom, $78-$98) and                                             Umezawa Japanese Sawara cutting board (top, $42)

Bernal Cutlery custom Port Orford Cedar cutting board (bottom, $78-$98) and Umezawa Japanese “sawara” cutting board (top, $42)

Josh keeps his cutting boards in top shape by wiping them clean immediately after use, periodic cleanings with salt and lemon juice, and treating them every so often with walnut oil. There are many products such as mineral oil, beeswax, almond or coconut oil on the market to treat and protect wood. Ultimately, cutting board treatment is a personal preference. Wood cutting boards should never be put in the dishwasher or soaked in water, and should be wiped dry after use and cleaning.

Kitchen Culture

November 29, 2012

I have been lucky enough to travel extensively throughout the Middle East and Europe, and many of my favorite memories involve getting to know other women while helping out in their kitchens. In Arab culture, if you are a guest and you offer to help, you are promptly rebuffed and told to relax. With a little perseverance, however, I learned that women in every country I have visited are extremely proud of the food that they make for their friends and families. Once I showed genuine interest in how they were preparing their food, I found my hosts were more than happy to teach me their recipes, techniques, and cultural cooking practices inscribed in them by their mothers, aunts and grandmothers.

When testing a recipe for galbi-tang, a Korean beef short rib soup, I asked Diane why the ribs were parboiled and not seared or broiled during their preparation. She stated that parboiling the ribs was a traditional step in Korean cooking in order to remove fat and blood from the ribs. This particular recipe actually calls for removing the ribs from the pot, rinsing the ribs and the pot, and then starting fresh with new water for the soup stock. Out of curiosity, I asked my best friend Claudia, a first generation Mexican-American, if her mother taught her to parboil meat. She stated that boiling was a significant part of meat preparation for many Mexican dishes, but that they skimmed the fat throughout the cooking process instead of removing and rinsing the meat.

In Lebanon, a nice family once invited me to their mountain home in the South for a weekend getaway from Beirut. The men hunted birds, and the women of the family prepared large and delicious traditional meals. While making one particular stew of dried beans and lamb shanks, the shanks were lightly parboiled before they were sautéed in spices and garlic. While parboiling is not a typical technique I have run across in Middle Eastern kitchens, in this particular case, the cook thought the sinewy and slightly fatty quality of the meat would be improved by parboiling. More typically, meat in Lebanese kitchens is washed repeatedly before cooking, and chicken is always rinsed multiple times with vinegar and lemon.

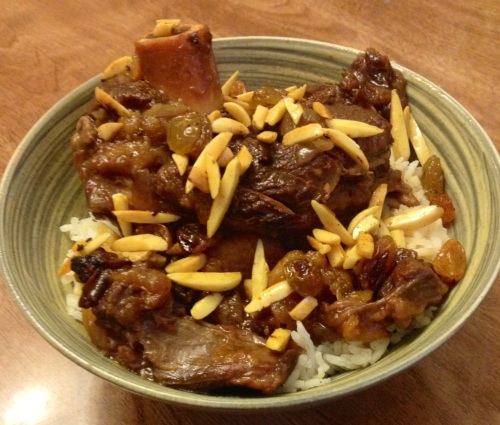
Braising is a more common technique in a typical Middle Eastern kitchen. Meat is browned in a mixture of spices (often dried and fresh), garlic, and onions, then water is added and the meat is cooked at a low simmer. One of my very favorite dishes is typical of Iraq, and a similar stew (often with the addition of honey) can be found in Moroccan cuisine. The below version is my own, modified from a recipe taught to me by a lovely Iraqi woman named Magda. You could substitute chicken or beef for the lamb, and experimenting with different dried fruits is always fun! I prefer to use bone-in meat, as it helps keep the meat moist over the long process of braising.

Sweet Lamb Stew

Serves 4-6

Ingredients

1 tablespoon canola or other neutral oil
1 medium white or yellow onion, diced
2 pounds bone in lamb shanks, cut in half lengthwise (if longer than 4 inches)
2 cloves garlic, minced
black pepper
2 tablespoons baharat (Middle Eastern Spice blend)
2 cups dried apricots
1 cup dried prunes
1 cup dried figs
~8-10 cups water
salt to taste
1/2 cup blanched almonds
1/2 cup sultanas (golden raisins)

In a pot large enough to hold the meat in a single layer, fry the onion in oil over medium heat until translucent. Add the lamb shanks and sauté until browned, about 6 minutes. Add the garlic, baharat and a few grinds of black pepper and cook a few minutes longer.

Pour eight to ten cups of water over the meat and onion mixture, making sure there is enough water to cover. Turn up the heat and bring pot to a boil. A fatty foam will rise to the top of the pot and start to come together. Skim this fat off and discard. When you are done skimming, cover the pot leaving the lid slightly ajar, and turn the heat down to a low simmer. You want the pot to be lightly bubbling, not violently roaring. Check the level of water as the pot simmers, adding a bit more water if the meat starts to become exposed. After an hour, check the meat – I like to cook this stew at least 2 hours, and 3 to 4 hours if I have time. You want the meat to be extremely tender.

When you feel the meat is close to ready, place the almonds in a pan and brown them over medium heat, shaking the pan to prevent burning. Add the sultanas, and cook together for a few minutes, then add both to the pot with the lamb and dried fruit. At this point I add about a teaspoon of salt, and taste the broth, and add more if necessary.

Serve this stew with basmati rice for a sweet-savory winter treat!

Roasted Chestnuts

November 9, 2012

It is my privilege to introduce Kim, an avid recipe tester and cookbook enthusiast. Having lived extensively in Egypt, Iraq and Lebanon, Kim loves to make Middle Eastern cuisine when she is not testing recipes for our cookbook. – Diane

Until recently, chestnuts were a figment of my wintertime imagination- a mysterious nut that was apparently roasted over an open fire, while someone named Jack Frost nipped at your nose. Strangely, it was not until I moved to Egypt that I first tasted chestnuts. When Cairo or the southern Nile villages cool off for their short winter, chestnuts get roasted in along the streets in hand-pushed carts, often accompanied by sweet potatoes or other tasty street snacks. Little old men in little wool caps yell out “Castana! Castana!” enticing passers by to sample their charred chestnuts, which are sold by the kilo straight off the fire.

When I moved to Lebanon many years later, I found chestnuts prepared in the same fashion. On many trips to Turkey I tossed the same piping hot chestnuts between my hands under the snow flurries of Istanbul, cherishing the warm, unique flesh held within an annoying casing of shell and husk. Today, when I was asked to test a raw chestnut salad dressed in peppery vinegar, I was intrigued by the concept of a chestnut being served as anything but a piping hot street treat.

Part of the fun of eating roasted chestnuts is trying to break through the charred shell only to be faced with removing the clingy husk. Sometimes, a chestnut miraculously and easily falls out of both, revealing shiny, brain shaped nutmeat. That fun challenge of peeling the charred chestnut is certainly missing while preparing bammuchim. Peeling a raw chestnut is not fun, but I persisted because the recipe promised me it would be worth it.

When I assembled the final salad: a mix of Korean chives, sliced chestnuts and cucumbers over a bed of thinly sliced Asian pears, I saw a new side of the chestnut. Maybe this salad tastes traditional and homey to a Korean, but to me, it was a new modern spin on the chestnut, revealing potential beyond the open fire and cold winter nights. The salad is bright, and the sharpness of the vinegary dressing pairs well with the slightly sweet crunch of the chestnuts and cucumbers. The green onions provide an herby freshness, and the flavorful Asian pears provide a nice contrast to the dish. I would love to serve this unique dish to friends and family and show them a different side of the chestnut.

To prepare chestnuts as they do in Egypt, Lebanon and Turkey, choose fresh chestnuts that don’t have air between the shell and the meat. Slice an X into the shell, allowing room for the chestnuts to vent once they heat up. Place the chestnuts in a skillet over a medium high flame, and pour in ¼ cup water. Cover the skillet and bring the water to a boil, gently shaking the pan until the water evaporates. The shells of the chestnuts will start to blacken and crackle, but continue to shake the skillet until the shells are mostly charred. As soon as the chestnuts are cool enough to handle, peel off the shell and husk, and enjoy!